-
Analysis & Computation
305 -
Development & API
2 -
Development Tools
1 -
Execution & Performance
1,027 -
Feed management
1 -
HW Connectivity
115 -
Installation & Upgrade
267 -
Networking Communications
183 -
Package creation
1 -
Package distribution
1 -
Third party integration & APIs
289 -
UI & Usability
5,454 -
VeriStand
1
- New 3,059
- Under Consideration 4
- In Development 4
- In Beta 0
- Declined 2,639
- Duplicate 711
- Completed 336
- Already Implemented 114
- Archived 0
- Subscribe to RSS Feed
- Mark as New
- Mark as Read
- Bookmark
- Subscribe
- Printer Friendly Page
- Report to a Moderator
Diagram Disable Structure More Intuitive
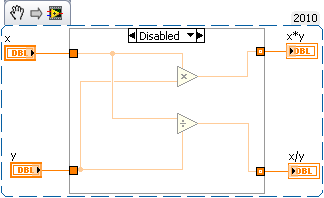
The Diagram Disable Structure is not intuitive. As it is, the Diagram Disable Structure is basically a Case Structure; the code in the Disabled case does not run and the code in the Enabled case runs. If I add a Diagram Disable Structure on my block diagram I get this:
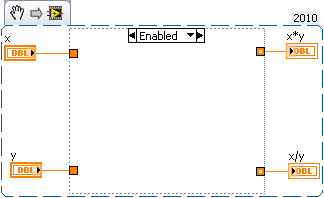
The code I selected is disabled. Makes sense so far. If I switch to the Enabled case, I see this:
AKA, no code will run (because there's nothing in the case). Again makes sense.
Now the problem is if I want to switch between enabling and disabling my code. I could place the code I want to run in the Enabled case, but then to disable the code I must delete it all. Or I could delete the Diagram Disable Structure. But then to re-disable the code I must add the Diagram Disable Structure again. Confusing to follow and annoying to do every time.
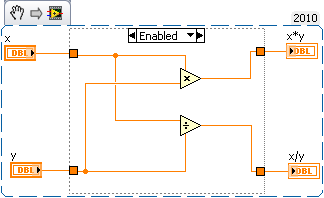
I wish it worked like this:
I add the Disable Diagram Structure and it looks like this:
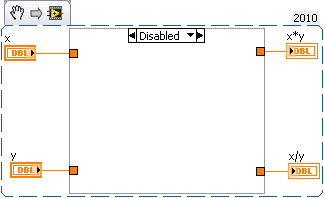
If I leave the block diagram looking like this, the code will run as it appears. However, if I switch the case on the Block Diagram it should look like this:
Again, it will run just as it appears (nothing happens because I see no code). I can put code in this case that I want to run when the other code is disabled, but basically whatever I see on the Block Diagram when I hit run is what will be executed.
I understand that this is a little different than most structures in LabVIEW that run the same no matter what you currently see on the block diagram, but it seems to be the only way to make the Diagram Disable Structure intuitive.
National Instruments
You must be a registered user to add a comment. If you've already registered, sign in. Otherwise, register and sign in.


