- Document History
- Subscribe to RSS Feed
- Mark as New
- Mark as Read
- Bookmark
- Subscribe
- Printer Friendly Page
- Report to a Moderator
- Subscribe to RSS Feed
- Mark as New
- Mark as Read
- Bookmark
- Subscribe
- Printer Friendly Page
- Report to a Moderator
Download link: Measurement Utility page and download (download the VIPC file attached to that page)
Please follow the step-by-step instructions at the end of this post for how to get this example working.
This is an initial prototype of an alternative controller for the Measurement Utility that provides a TestStand interface for the measurement abstraction layer. I am posting this early version to gauge reaction and interest to this type of approach - I want to hear if this is useful and how/if it would be employed.
The goal of this system continues to be to make it as simple as possible to add functionality to an existing system through plugin layers that abstract pieces of a system that are subject to the most amount of changes. The same template that is installed by the Measurement Utility is used to define a new measurement strategy, which will use abstract hardware interfaces. Both new meausrements and new hardware devices are plugins that can be loaded by the framework at run-time. For more information please visit the Meausrement Utility download page or read: Designing a LabVIEW Measurement System with Multiple Layers of Abstraction.
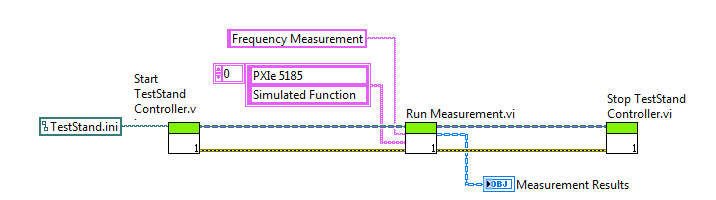
This particular controller provides a very simple interface that is to be called from TestStand. Shown below are the VIs that would be called from test steps in LabVIEW (an example Test Sequence is included to showcase how).
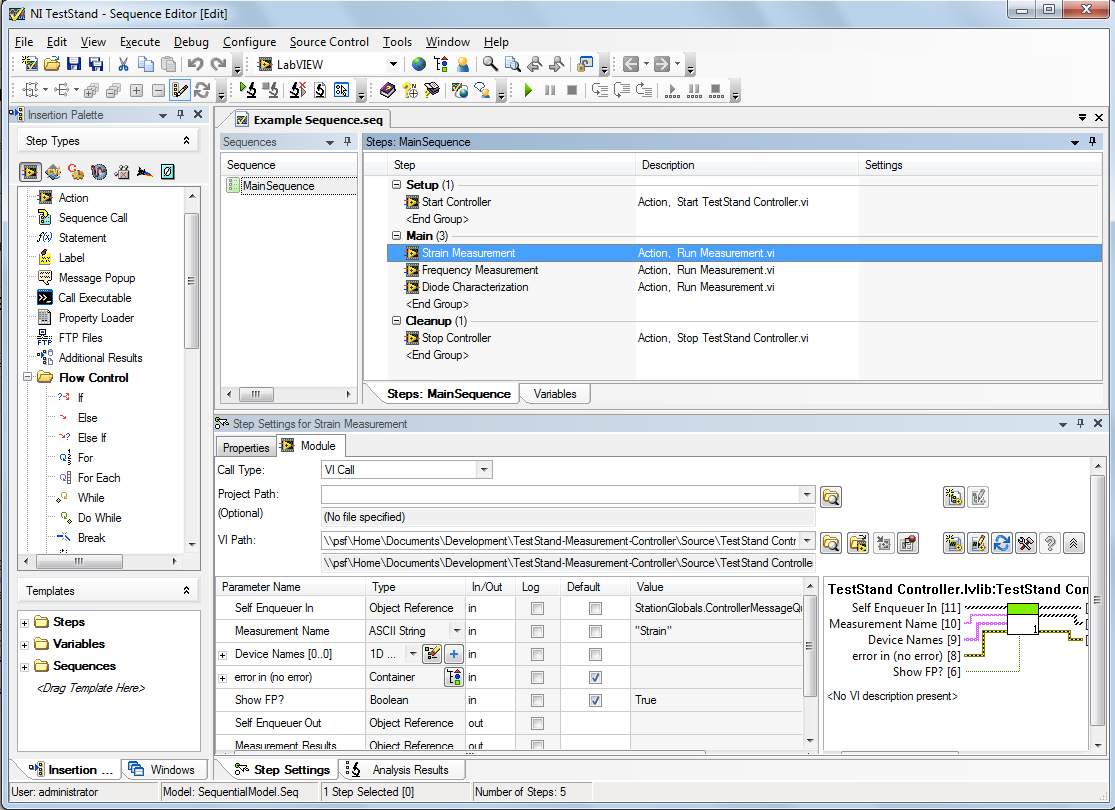
Which in TestStand looks something like this (this is an included example):
Though the API appears to be synchronous (ie: 'Run Measurement' will block until a result is returned), it still uses a messaging scheme to send commands to and from a running background process (ie: the controller). Commands that must return data (such as 'Run Measurement') encapsulte an un-named queue into the message, wihch is sent to the controller. The controller handles that message by launching a measurement (or enqueueing it until the resources are available). When the measurement returns results to the controller, those are then retuned to this API using the unique queue reference.
This simple API is designed to make creating highly-parallel tests very simple (think parallel test steps in TestStand). The wire that flows between these mehtods is effectively a 'reference' to the running actor (to call it a 'pipe' would be more technically accurate). As a result, this wire can easily be branched to parallel test sequences that can dispatch run commands simultaneously. The Controller will receive all of these and dispatch measurements as quickly as the necessary resources are available. Unlike a reference, the data the actor acts upon (ie: available hardware and their settings) is safely encapsalted by the running actor, thereby mitigating the risk associated with delicate timing issues and deadlock that can occur if using a reference directly to data.
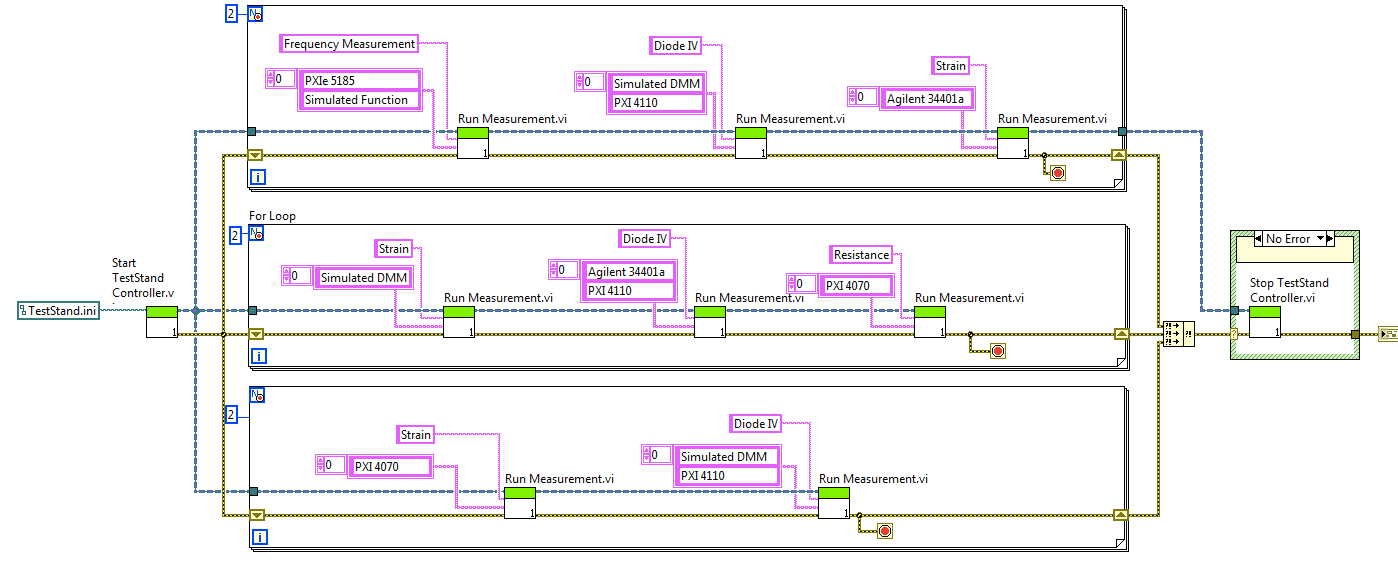
The screenshot below is of an included example that illustrates how this API can be used to parallelize message commands.
Installing required Software
- Ensure LabVIEW 2015 and TestStand 2014 are installed
- Download and install the Measurement Utility (the vipc file)
- (Optional) Download and install the sample hardware and meaurement plugins from the Measurement Utility Page (2x zip files)
- Download and install the vip file attached to this page
- When installation is complete, select the option to Open Examples
- Launch the example sequence file
- You will need to change the default search path in TestStand to include the TestStand public directory
- In TestStand, select 'Configure >> Search Directories'
- Add 'C:\Users\Public\Documents\National Instruments\TestStand'
- Select 'Search Subdirectories'
- Click OK
- In TestStand, select 'Configure >> Search Directories'
- You will need to change the execution system from the run-time to the ADE (the VIs are source-only)
- In TestStand, select 'Configure > Adapters'
- Select LabVIEW and click 'Configure'
- Change the radio button to 'LabVIEW Development System'
Setting up the measurements
The measurements that are in the sample sequence file will give you an error that the device is invalid if you attempt to run the sequence without following these additional steps:
- Ensure you have sample meausrements and hardware installed on your system (2 options):
- Click on the 'Start Controller' step (note that the dialog appears behind TestStand right now - it's a known issue we're working on)
- Add the locaiton where Measurements are installed
- Add the locaiton where Hardware is installed
- Click OK
- Click on a measurement and selct 'Configure Measurement'
Known Issues
- The dialogs that are invoked appear behind TestStand and are not brought to the foreground
- The load time the first time they're invoked is long with no dialog to the user
NI Director, Software Community
- Mark as Read
- Mark as New
- Bookmark
- Permalink
- Report to a Moderator
Looks like this example needs to be updated as it broke the previously installed Measurement Utility. Re-installation of Measurement Utility 3.0.3.6 Beta.vipc upgraded the following components:
- Mark as Read
- Mark as New
- Bookmark
- Permalink
- Report to a Moderator
Hey FixedWire - could you clarify what actually broke. I do believe that at some point I made some major re-architecture that broke a very very early version - can you remove all the packages from both versions and try installing the new version again? What version of LabVIEW are you using?
NI Director, Software Community
- Mark as Read
- Mark as New
- Bookmark
- Permalink
- Report to a Moderator
Thanks for the prompt response! LV & TS 2014 are installed.
Looks like everything was installed into \My Documents\Natioanl Instruments\TestStand 2013.
The sequence editor calls the LabVIEW Run-Time 13.0.1.f5. (don't believe this is installed on this machine).
The Measurment Utility 3.0.3.6 was installed first, then the TestStand Measurement Abstraction Layer got installed which broke the 3.0.3.5 Beta package. The 3.0.3.6 version then got reinstalled as I wanted to work with this first. Being able to do parallel TestStand execution is appealing...
Here's what is installed:
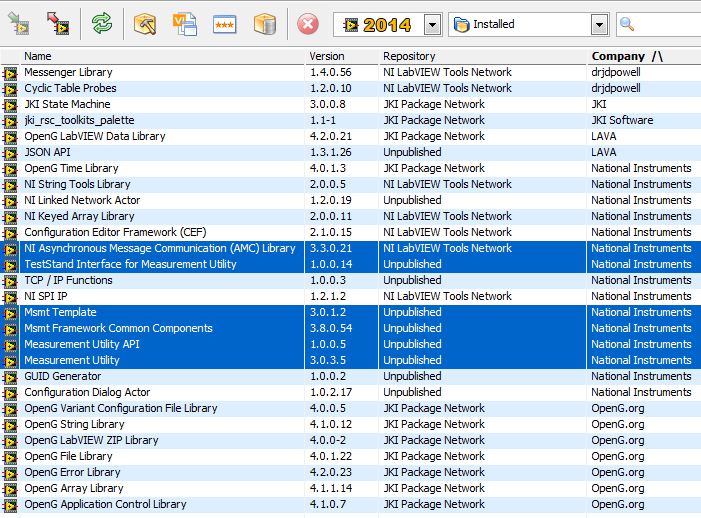
Here´s a snapshot comparing both vipc packages.

- Mark as Read
- Mark as New
- Bookmark
- Permalink
- Report to a Moderator
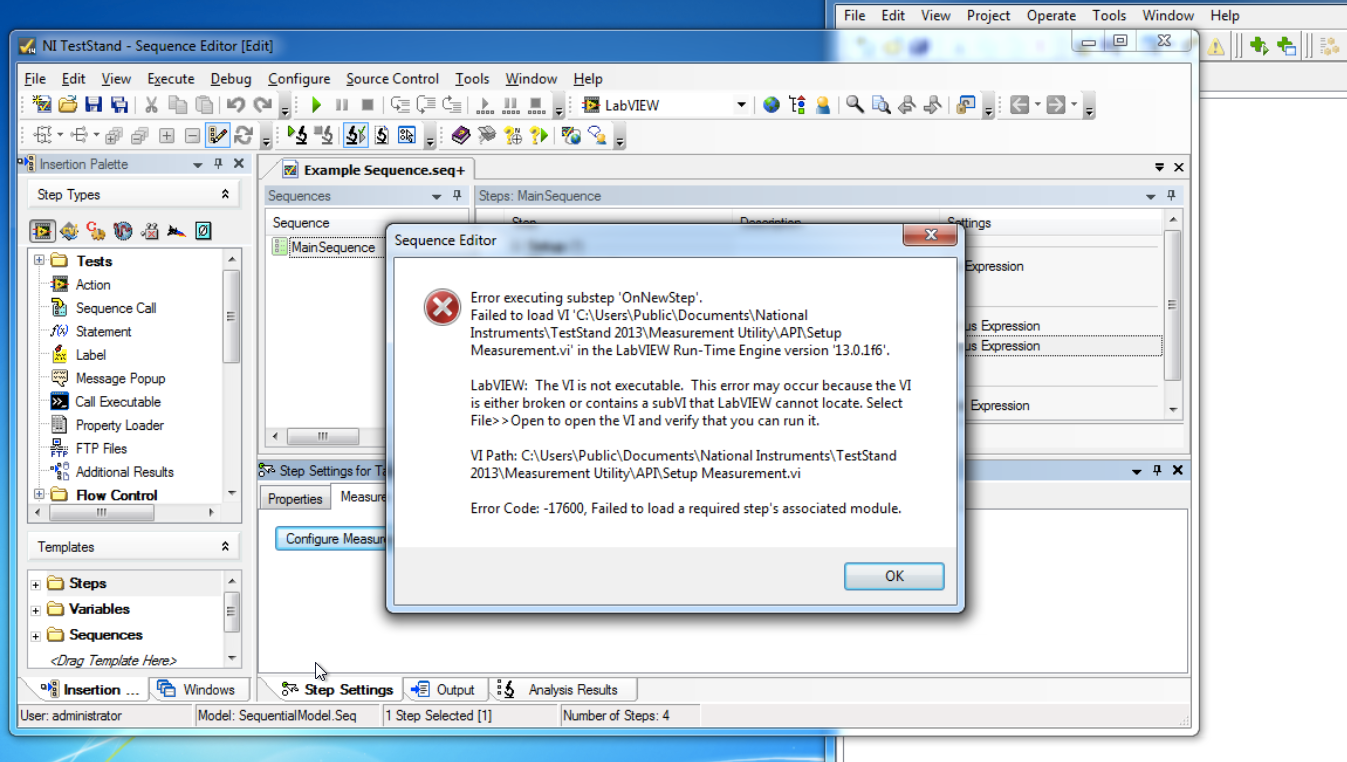
I am trying to use this as it is just what the new test requirements call for,,, but no matter the order of installing Measurement Utility and the Measurement Controller for Teststand... I get the following error
Error Code: -17600, Failed to load steps's associated module
Failed to load VI 'C:\Program Files (x86)\National Instruments\LabVIEW 2014\user.llb\Measurement Utility\API\Configure Controller.vi' in the 'LabVIEW Development System' version '14.0.1f3'.
- Mark as Read
- Mark as New
- Bookmark
- Permalink
- Report to a Moderator
Both of you have uncovered an issue with TestStand support of the example. You should still be able to run the LabVIEW only example. I will try to build and publish a fix for the TS piece shortly
NI Director, Software Community
- Mark as Read
- Mark as New
- Bookmark
- Permalink
- Report to a Moderator
Thanks for your quick reply...
A working TestStand example would be a HUGE benefit
Date: Tue, 19 Apr 2016 11:49:41 -0500
From: web.community@ni.com
To: twyman53@hotmail.com
Subject: Re: - Measurement Utility Controller for TestStand
NI Community
Measurement Utility Controller for TestStand
new comment by Elijah_K View all comments on this document
Both of you have uncovered an issue with TestStand support of the example. You should still be able to run the LabVIEW only example. I will try to build and publish a fix for the TS piece shortly
Reply to this email to respond to Elijah_K's comment.
- Mark as Read
- Mark as New
- Bookmark
- Permalink
- Report to a Moderator
Okay, I've reproduced the issue:
The first step is admitting you have a problem 🙂 Hang on..
NI Director, Software Community
- Mark as Read
- Mark as New
- Bookmark
- Permalink
- Report to a Moderator
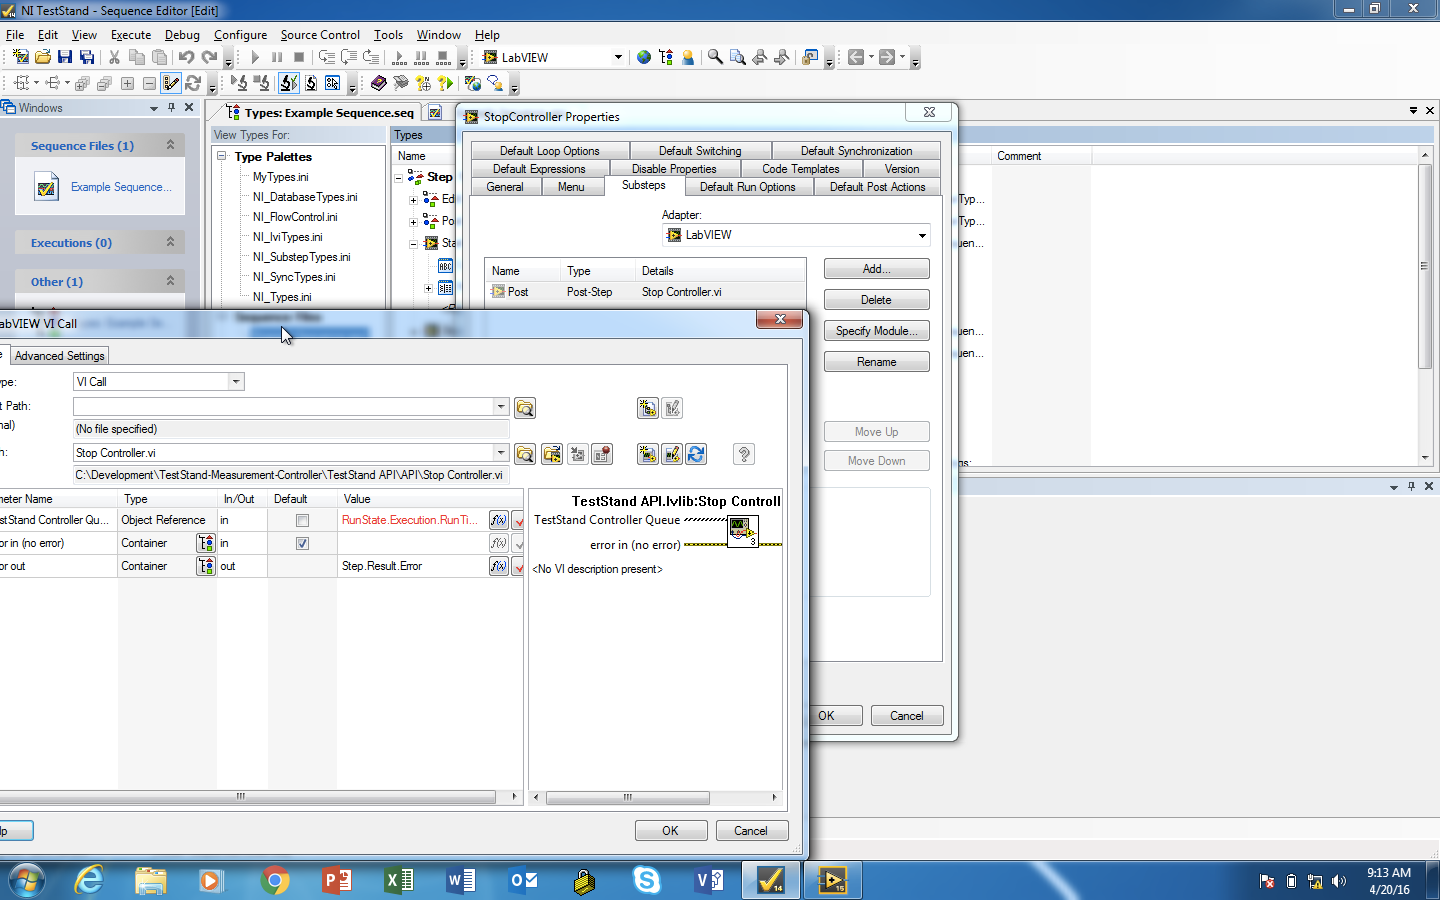
The issue is with the search paths TestStand uses to load the custom step types from... I'm very rusty on my TestStand programming, so this may require that I get TS R&D to help me figure out how to make sure the search paths are valid once installed. Not giving up quite yet...
NI Director, Software Community
- Mark as Read
- Mark as New
- Bookmark
- Permalink
- Report to a Moderator
I know how to fix it using absolute paths for the step types, but working on determining how to make the paths adapt to the install locaiton of the source VIs. Awaiting a response from TS R&D
NI Director, Software Community
- Mark as Read
- Mark as New
- Bookmark
- Permalink
- Report to a Moderator
update: working on this in my free time. may have a fix. building and testing tonight.
NI Director, Software Community
- Mark as Read
- Mark as New
- Bookmark
- Permalink
- Report to a Moderator
Okay, I may have a fix. Download and install the following two items AFTER having installed the previous vipc file:
- Example Sequence.seq (7.0 K)
- national_instruments_lib_teststand_interface_for_measurement_utility-1.0.0.16.vip (398.9 K)
NI Director, Software Community
- Mark as Read
- Mark as New
- Bookmark
- Permalink
- Report to a Moderator
Uhhhh,, Mr. Elijah,, those new downloads need to be linked, I think....
Date: Thu, 21 Apr 2016 12:53:05 -0500
From: web.community@ni.com
To: twyman53@hotmail.com
Subject: Re: - Measurement Utility Controller for TestStand
NI Community
Measurement Utility Controller for TestStand
new comment by Elijah_K View all comments on this document
Okay, I may have a fix. Download and install the following two items AFTER having installed the previous vipc file:
Example Sequence.seq (7.0 K) national_instruments_lib_teststand_interface_for_measurement_utility-1.0.0.16.v ip (398.9 K)
Reply to this email to respond to Elijah_K's comment.
- Mark as Read
- Mark as New
- Bookmark
- Permalink
- Report to a Moderator
They're attached to the document
NI Director, Software Community
- Mark as Read
- Mark as New
- Bookmark
- Permalink
- Report to a Moderator
Hello Elijah,
the package requires LabVIEW Versions >= 2015.
Is it possible to build a package for earlier versions? At least for LV2014?
- Mark as Read
- Mark as New
- Bookmark
- Permalink
- Report to a Moderator
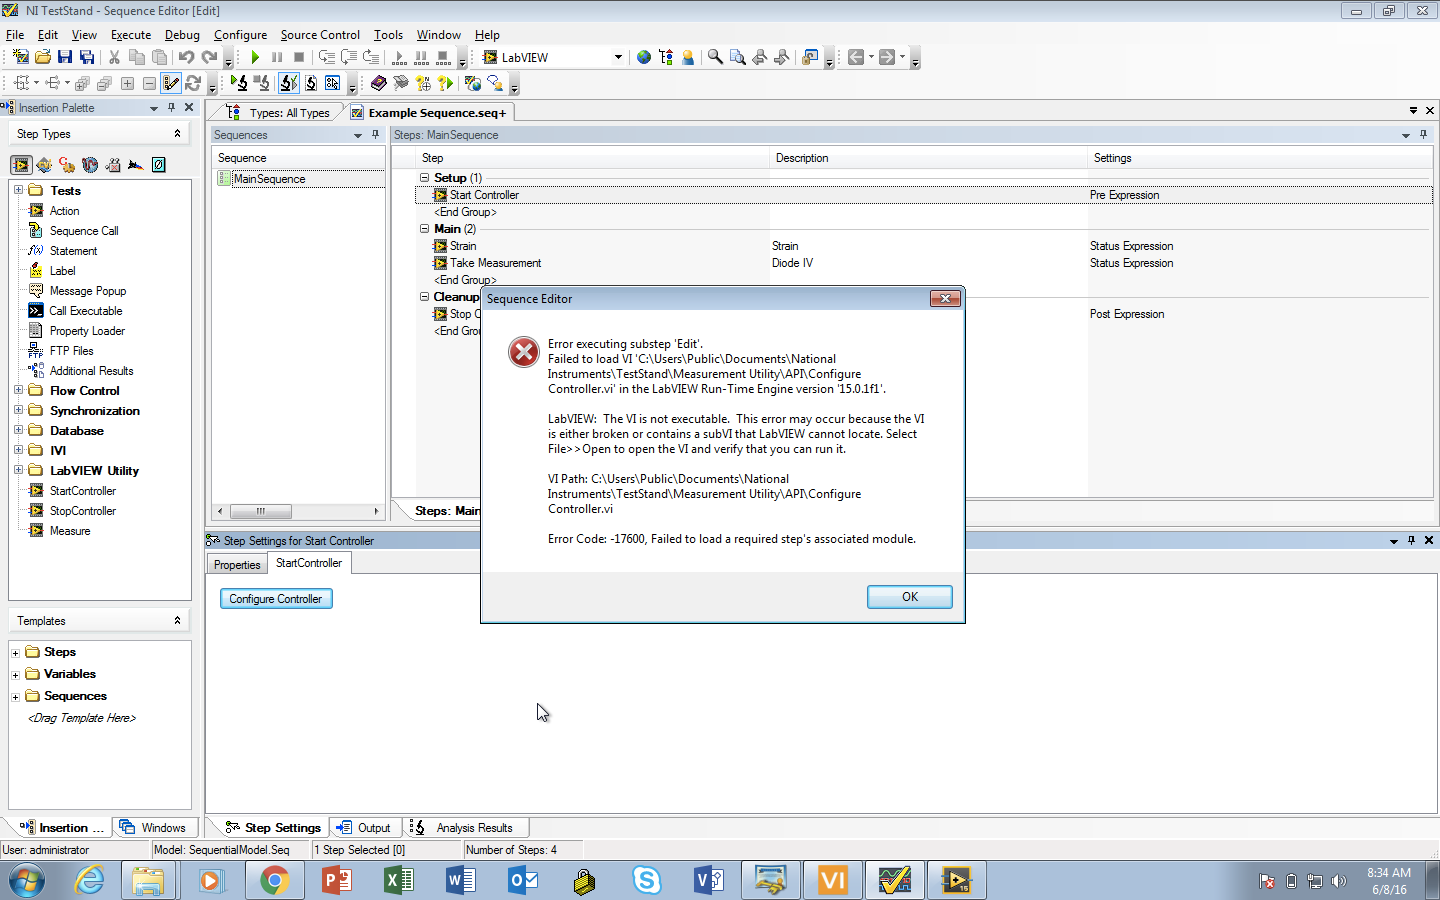
New package attached to this page with step-by-step instructions for how to get the TestStand example working.
NI Director, Software Community
- Mark as Read
- Mark as New
- Bookmark
- Permalink
- Report to a Moderator
There is still a bug right now (see screenshot). Working on it right now.
NI Director, Software Community
- Mark as Read
- Mark as New
- Bookmark
- Permalink
- Report to a Moderator
Fixed! Follow instructions outlined in step 8
NI Director, Software Community
- Mark as Read
- Mark as New
- Bookmark
- Permalink
- Report to a Moderator
Is it possible to develop Veristand custom device using OOP?
