- Document History
- Subscribe to RSS Feed
- Mark as New
- Mark as Read
- Bookmark
- Subscribe
- Printer Friendly Page
- Report to a Moderator
- Subscribe to RSS Feed
- Mark as New
- Mark as Read
- Bookmark
- Subscribe
- Printer Friendly Page
- Report to a Moderator
Virtual Piano Project
LabVIEW Student DesignCompetition
- SUBMISSION TEMPLATE -
Virtual Piano Project 1.2
Contact Information:
University: Università degli Studi di Salerno (Italy)
Team Member(s): Luigi D'Acunto, Lluis Bolivar, Mariano Ribas, Rafael Vidal
Faculty Advisors: Prof. Antonio Pietrosanto, Dr. Alfredo Paolillo
Email Address: pipizanzibar@hotmail.com
Project Information:
Title: Virtual Piano Project 1.2
Description:
This Software creates a piano keyboard using a projector, detects if somebody plays a key and plays the note as it was a real piano. It's composed by three essential parts:
1. Projector Calibration
2. Camera Calibration
3. Finger tracking
Products:
LabView 2009 SP1
Vision 9.0
The Challenge:
When you start reading this article you may ask yourself : “ what is a Virtual Piano?” A virtual piano doesn’t really exist, because it’s made up of a projector, and you can play it with your fingers or with a stick.
Virtual Piano project is not only a funny game, but the beginning of a road that leads to a new kind of technology. In fact, in a not very distant future, we can imagine that every interface peripheral as a keyboard or a mouse, may be replaced by a projected one, much more portable, quicker and easier to use.
In the musical area, with this kind of technology, everyone should be able to play a keyboard or a drum everywhere without carrying heavy instruments.
The Solution:
Our solution requires a projector, a camera and a pc with LabView and it can be divided in three esential parts:
1. Projector Calibration
2. Camera Calibration
3. Finger tracking
So now we are going to explane all the steps we made to reach the final result that can be watched on the linked video.
Test Conditions:
- - Hardware:
- Camera: colour camera kit CC6 (DFK31F03)
- Projector: 3M MPro150 Pocket Projector
- Computer
- - Software:
- LabView 2009 SP1
- Vision 9.0
- NI-IMAQdx 3.7
- - Dimensions:
- The height between the projector and the platform of projection is 48cm.
- The height between the camera and the platform of projection is 41cm.
- The horizontal distance between projector and the platform is 37cm.
- The horizontal distance between camera and the platform is 37 cm.
- The distance between projector and camera is 75 cm.
These dimensions can be modified, but then is necessary to redo the calibration of both projector and camera
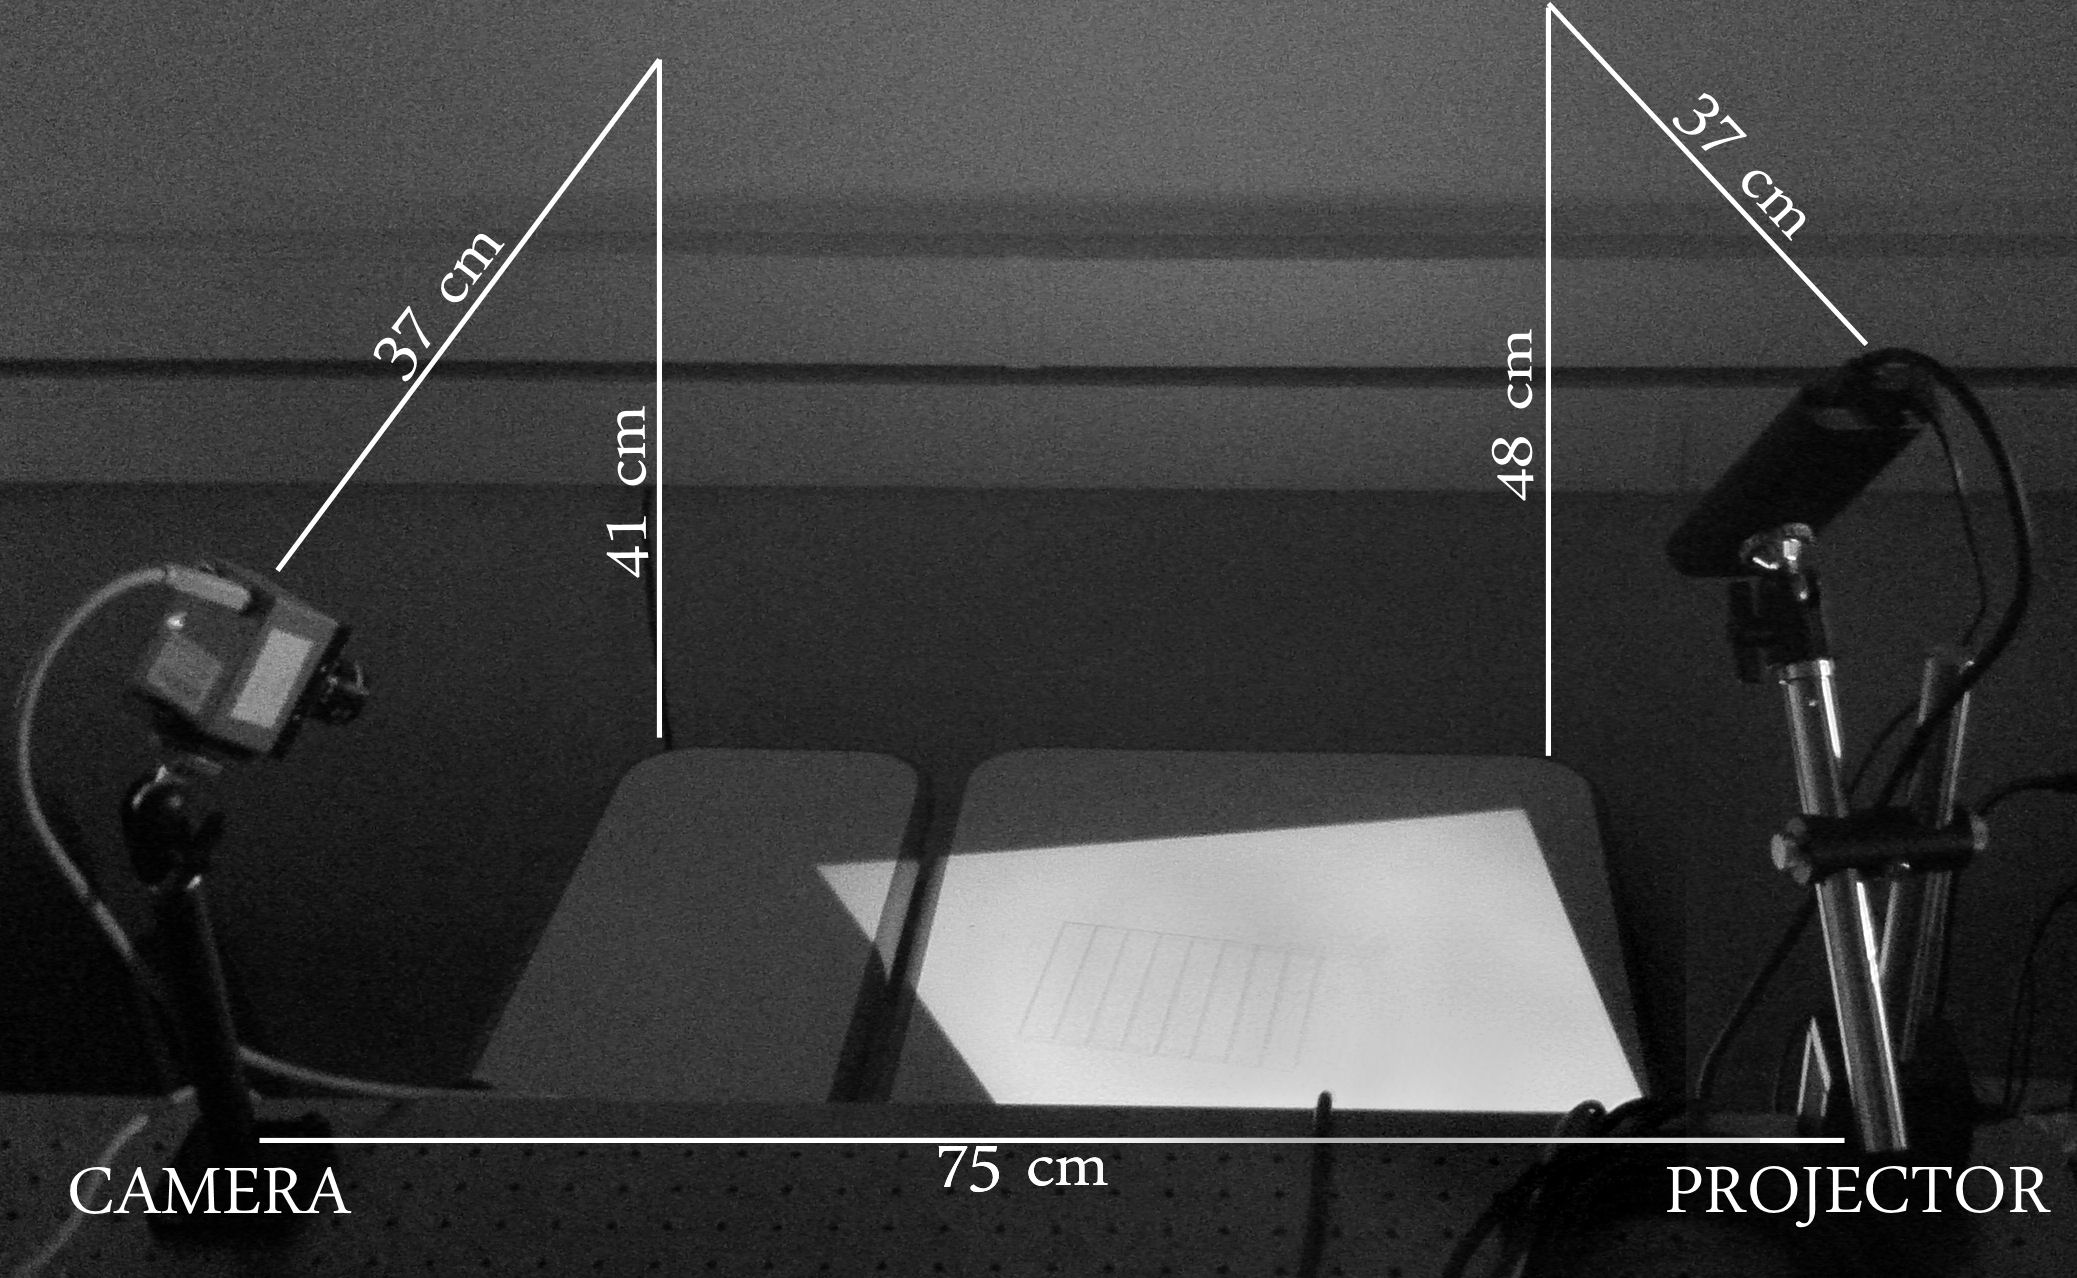
Figure 1: Camera & Projector system
Calibration:
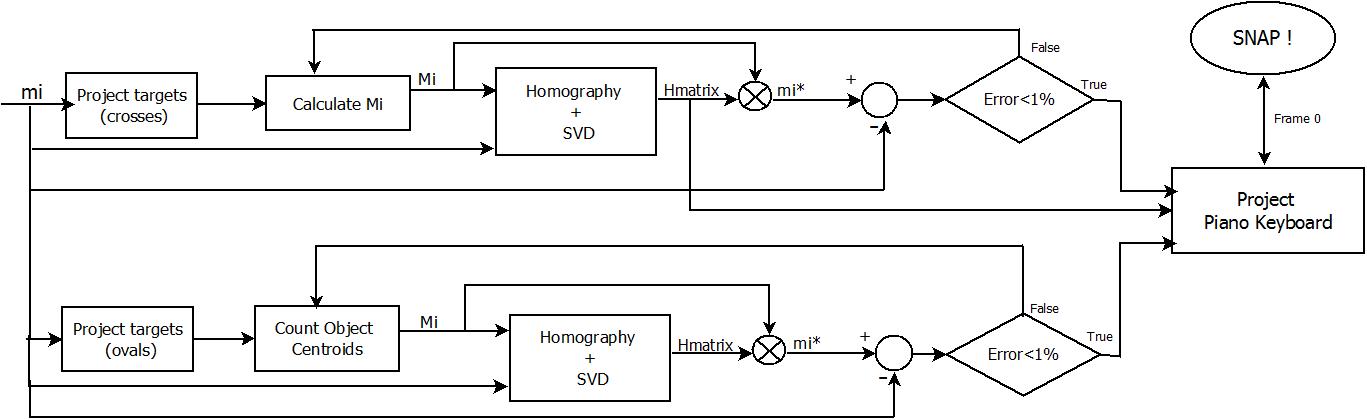
Figure 2: Block diagram of the calibration of both projector and camera
You may wish to avoid the calibration by putting the projector orthogonally to the plane of the piano, but this solution is not possible, because the hand of the user would be totally between the light and the piano and so it would cover the projection.
So we angled the projector more or less of 45 degrees and then we used a “vi” to calibrate it correctly with a homography.
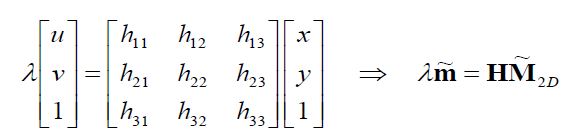
Figure 3: H matrix definition
So it is possible to make up a relationship between m (pixel coordinates) and M (absolute coordinates) by using the H matrix.
One way is to calculate the A matrix shown below, using at least four points of calibration of which we have to know, or should be able to calculate, the absolute and the pixel coordinates.
We decided to use 8 targets of calibration (8 crosses) of which we know the centroid coordinates.
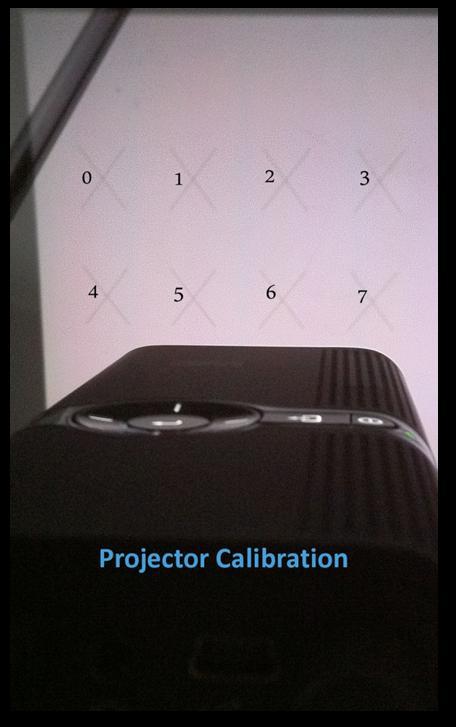
Figure 4: Projector point of view
The homography just makes up the A matrix, as shown in the figure below:
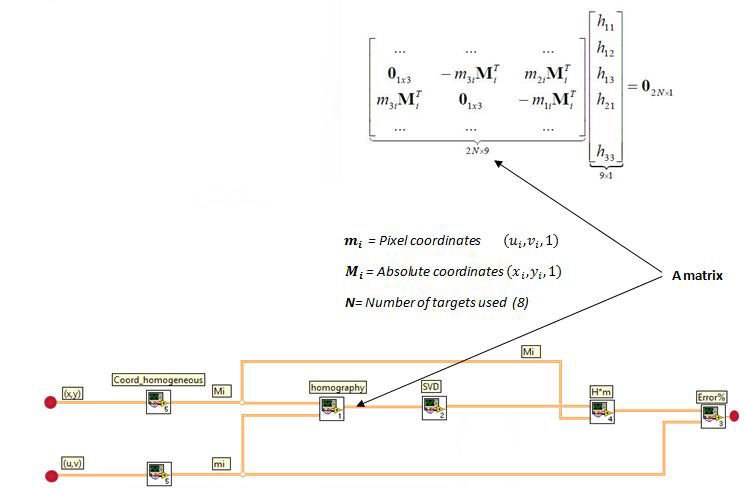
Figure 5: Labview code that generates the H matrix and calculate the error of re-projection
Then it’s possible to obtain the H matrix by using the SVD (single value decomposition), that calculates:

Now it’s possible to demonstrate that, the H matrix lays in the last column of V matrix. So, once reshaped the last column of V matrix, we have obtained the H matrix for the projector.
Once it’s verified that the re-projection error is smaller than 1% it’s possible to project the piano keyboard, otherwise it’s necessary to check the absolute and pixel coordinates. The shift (of 1920 pixel) is a parameter accessible to the user and it depends on the screen resolution.
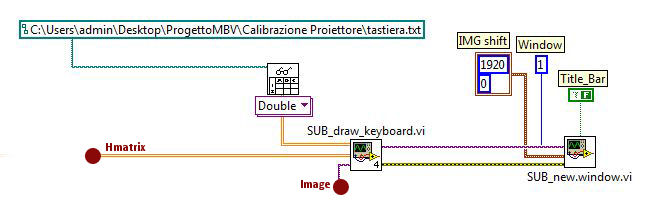
Figure 6: Labview code that generates and projects the keyboard using extended desktops
We did not put the black keys because this is just a demonstration of LabView possibilities and not the final version of the software.
Camera Calibration:
Camera calibration is not completely necessary but it’s very helpful in the detection of the position of the finger, so we decided to make it by projecting circular-shaped black targets and by detecting the position of the centroids with the count-object function. In this way we obtain the pixel coordinates of the centroids; so, because of the fact we have got absolute coordinates of the centroids, that are the same used for the projector, it is easily possible to obtain the H matrix of the Camera with the homography. The H matrix will be used in finger tracking.
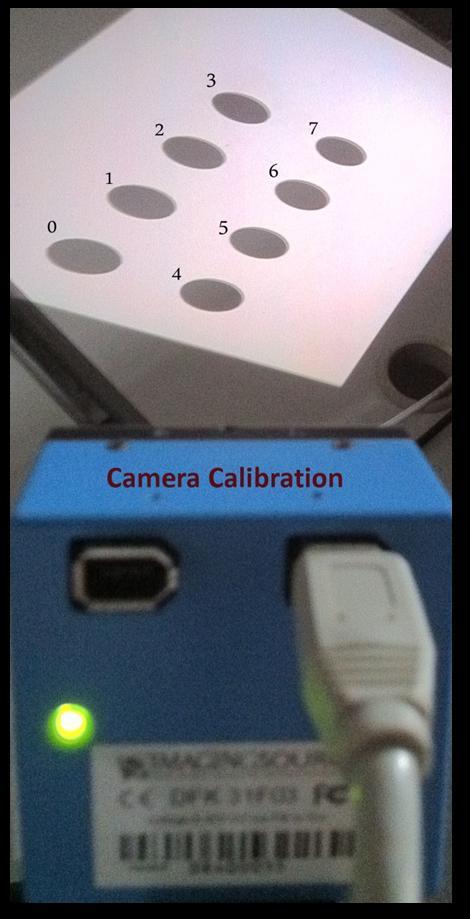
Figure 7: Camera Point of view
Finger Tracking:
This is the most important VI of the project because it detects the position of the finger and plays a sinusoidal tone at the real frequency of the note. In a while loop, breakable by the user, the camera RGB frames are continually acquired (but we just use a grayscale U8 image for the detection).
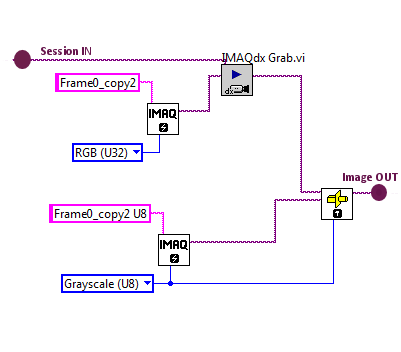
Figure 8: Acquisition of frame
For each frame a pre-filtering sub-vi is made that, using the H matrix acquired in camera calibration, resizes the frame’s dimensions in order to reduce the computationally coast of the algorithm and paints every pixel that lays out of the keyboard in black. This pre-elaboration of the image lasts not more than 10 ms, so it’s quick and very helpful, since it cuts every unwanted detail off.
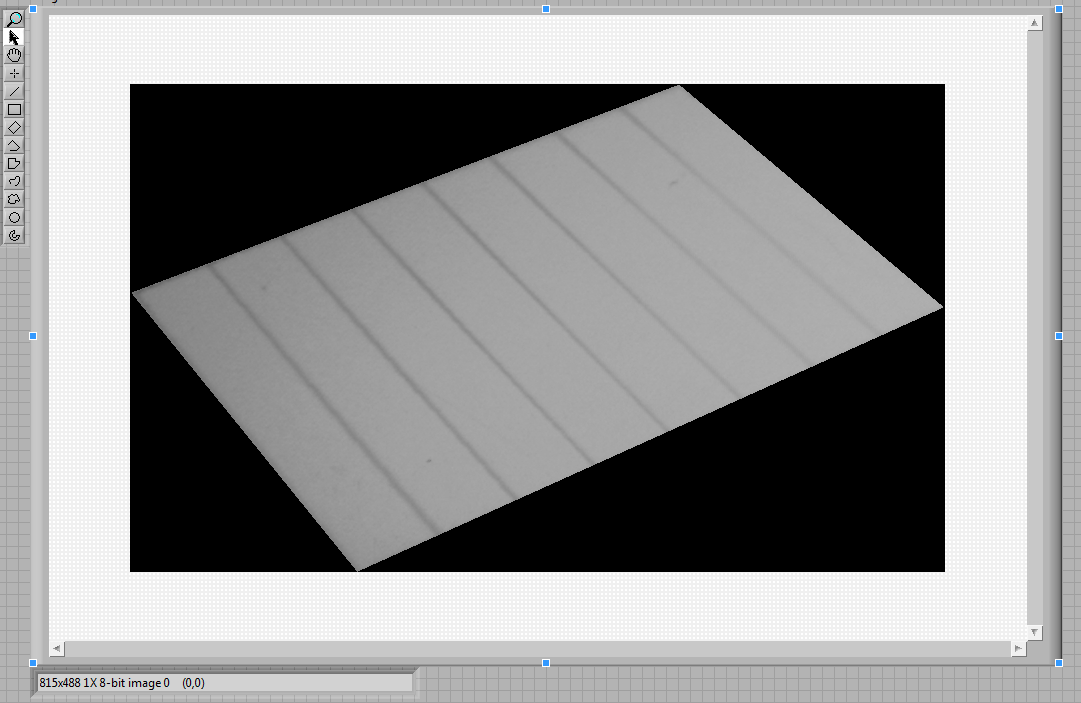
Figure 9: Action of the prefilter
Next of the pre-filtering, the frame of the nth acquisition is compared (with an absolute difference) to the first frame acquired by the camera, that will be used as a mask for every following frame, and with a threshold, whose range can be controlled by the user, it’s possible to obtain a binary black and white image.
Working in this way the noise between the first and the nth frame (that can be imagined as a small pixel value variation) is fully cut off.
The threshold is set by default in order to change every pixel of grey value greater than 60 into white and every pixel with grey level smaller than 60 into black.
So now, before we put the finger on the piano, because of the small variations between the frame 0 and the nth frame, the image viewed should be totally black.
When something as a finger or a tick enters the keyboard, the comparison and the following threshold make it totally white. Now by using a Count-Object.vi function, all the bright objects in the image bigger than a minimum area are identified.
This means two things: you can detect more than one object at the same time, so it’s possible to play with more than one finger , and that the shadow of your finger would be identified as if it were a finger! 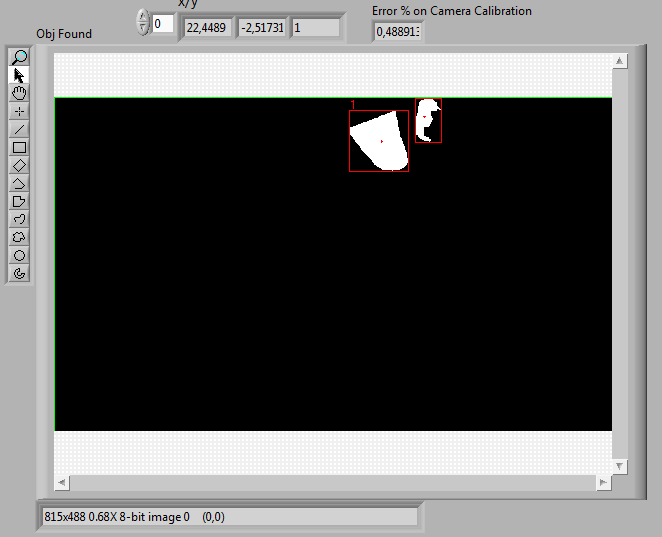
Figure 10: The finger (obj 0) and its shadow (obj 1)
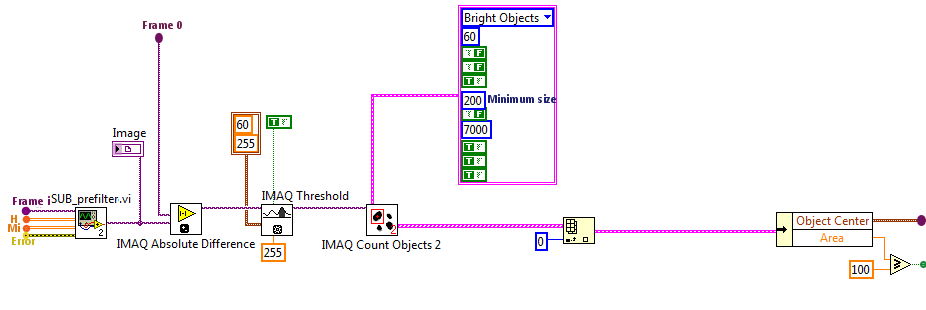
Figure 11: Labview code that finds the finger
Anyway, due to the relative positions of camera and projector we chose ,the shadow of the finger results always at the right of the finger.
So, because it was not in our interest to play more than one note per frame, we preferred to consider just the first of the objects detected by the Count Object.vi function.
This choice implies that it is not possible to play the keyboard using more than one finger per time, but the bigger advantage is that the shadow of the finger, that during the transitions from a note to another is detected just like a finger, does not influence the played note.
In order to detect the note we use the centroid pixel-coordinates of the object found and we compare them, by using the H matrix, with the absolute-coordinate of the projected keyboard.
This is an extremely strong solution because it can solve “danger” situations in which the finger appears to be playing more than one note from the point of view of the camera.
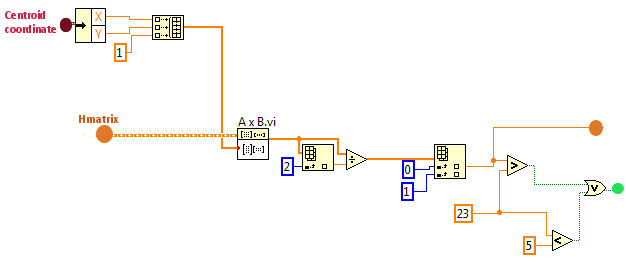
Figure 12: Labview code that decides if a centroid of an object is part of the piano
So in every iteration of the loop in which a note is detected, a sound made of a number of samples is played and can be chosen by the user. The default is 8000 samples.
Choosing a bigger number makes the sound much cleaner, but slows down the performances of the algorithm introducing a delay between two different sounds.
The sounds played are pure sinusoidal tones generated at the real frequency of the notes according to the twelve-tone equal temperament.

Figure 13 : Block Diagram of the Finger Tracking
Final considerations:
The image analysis lasts about ten milliseconds with the pc used to test the software.
This is an important detail because algorithms that analyze every pixel of the image are not good for this kind of problem: the frame acquisition made by the camera results too slow. The finger tracking algorithm, instead, makes possible to acquire more than ten frames per second!
We called it finger tracking because of its continuous research of the centroid of the finger.
Finger tracking is a versatile and strong solution: because of the fact that calculates the centroid coordinates of the object that appears on the keyboard it is possible to play piano with every kind of object, or to allow only fingers to play.
The limits of this kind of solution are that the pressure of the digit is not detectable and that it doesn’t work good in very bright environments.
The main advantages are the speed of execution and the possibility to easily adapt the algorithm to whatever function.
In future it is possible to imagine an application of this experimental project maybe integrating a projector in a mobile phone and giving the user the possibility to play piano everywhere, or to have a keyboard or a mouse to remote control their mobile phone in a totally portable way.
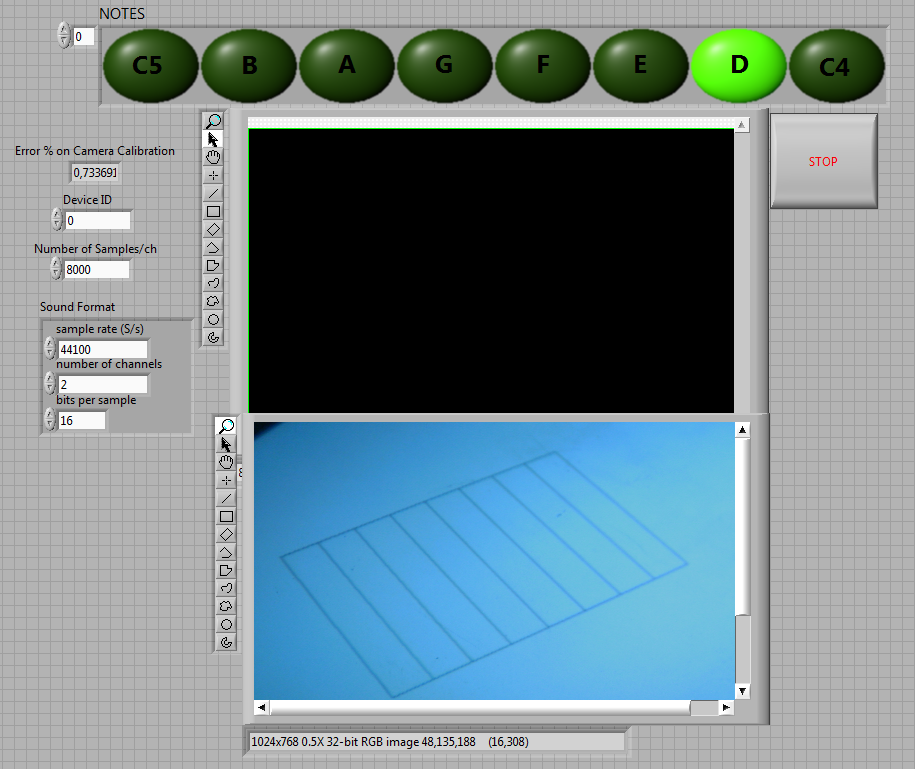
Figure 14: Frontal Panel
****
In the file project.zip there are two folders: Calibrazione_proiettore and Acqusizione_tastiera.
The Calibrazione_proiettore_folder contains all the "vi" and subvi necessary for the projector calibration.
The Acquisizione_tastiera_ed_elaborazione_folder contains some txt files necessary for the projection of the keyboard and testing operation, some SUBvi and the file main.vi.
Main.vi contains all that is necessary to correctly calibrate the camera, to find the finger and find the note. So it is the most important vi of the project.
Powered by:
Luigi D’Acunto (Università degli studi di Salerno)
LLuis Bolivar (Universitat politecnica de Catalunya, Spain, Erasmus @ Università degli studi di Salerno, Italy)
Mariano Ribas (Universitat politecnica de Catalunya, Spain, Erasmus @ Università degli studi di Salerno, Italy)
Rafael Vidal (Universitat politecnica de Catalunya, Spain, Erasmus @ Università degli studi di Salerno, Italy)
- Mark as Read
- Mark as New
- Bookmark
- Permalink
- Report to a Moderator
too much beauty all aorund us
- Mark as Read
- Mark as New
- Bookmark
- Permalink
- Report to a Moderator
wow
- Mark as Read
- Mark as New
- Bookmark
- Permalink
- Report to a Moderator
bel progetto
Secco Pacio
- Mark as Read
- Mark as New
- Bookmark
- Permalink
- Report to a Moderator
marvelous, long and hard ❤️
- Mark as Read
- Mark as New
- Bookmark
- Permalink
- Report to a Moderator
Great
- Mark as Read
- Mark as New
- Bookmark
- Permalink
- Report to a Moderator
contact me
- Mark as Read
- Mark as New
- Bookmark
- Permalink
- Report to a Moderator
I like It
- Mark as Read
- Mark as New
- Bookmark
- Permalink
- Report to a Moderator
impossible is nothing
Olaf Gnomo
- Mark as Read
- Mark as New
- Bookmark
- Permalink
- Report to a Moderator
Bravo bel progetto.
- Mark as Read
- Mark as New
- Bookmark
- Permalink
- Report to a Moderator
inside all the people
Elio Stevenson
- Mark as Read
- Mark as New
- Bookmark
- Permalink
- Report to a Moderator
WOW creative
- Mark as Read
- Mark as New
- Bookmark
- Permalink
- Report to a Moderator
gr8:) keep it up!!
- Mark as Read
- Mark as New
- Bookmark
- Permalink
- Report to a Moderator
good job thank you
- « Previous
-
- 1
- 2
- Next »
